The Perfect Ladi Pav: Soft, Savory Buns for Your Bhaji
A Hyderabad Hunt for the Ideal Ladi Pav
After moving to Hyderabad, we craved the savory goodness of Pav Bhaji but found the local Ladi Pav to be too sweet. Determined to enjoy this classic dish authentically, we embarked on a quest for the perfect eggless Ladi Pav recipe.
A Baker’s Gift: The Recipe Revealed
Through a baker friend, we discovered a secret weapon – an eggless Ladi Pav recipe that delivers the ideal balance of soft texture and savory flavor. This recipe is perfect for those who enjoy the deliciousness of Pav Bhaji without the sweetness often associated with Hyderabadi Pav.

Essential Tips for Baking Success:
- Ditch the Glass Dish: For even baking, use a square bread mold made of aluminum. Glass is not an ideal conductor of heat and can lead to unevenly cooked buns.
- The Power of Patience: Allow the yeast mixture to activate for 10 minutes, and let the dough rise twice – for about an hour each time.
- Knead to Perfection: Knead the dough for a full 15 minutes. The dough will transform from sticky to smooth, indicating proper gluten development. Resist the urge to add flour or oil – the dough will become soft on its own.
- Shaping and Rising: Divide the dough into equal portions, shape them into balls, and place them close together in the greased baking tin. This ensures they rise upwards instead of spreading out flat. Cover with a damp cloth for another 40-45 minutes for a final rise.
A Touch of Milk and Butter:
Before placing the pav in the oven, brush them gently with milk for a touch of golden brown color. After baking, brush the tops with butter for added richness and shine.
The Perfect Complement to Your Bhaji
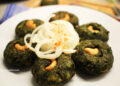
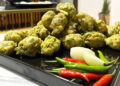
These soft and savory Ladi Pav buns are the ideal accompaniment to your next Pav Bhaji creation.
- Focaccia with fried onion and tomato recipe (फोकाचीया ब्रेड, प्याज और टमाटर रेसिपी)
- Pineapple and Capsicum Mayo Cream Cheese Sandwich
- Dominos Style Cheesy Garlic Bread Sticks Recipe (डोमीनोज चीजी गार्लीक ब्रेड स्टीक)
Ready to Bake?
Arpit invites you to try this recipe and share your experience in the comments. With its detailed instructions and helpful tips, you’ll be well on your way to baking perfect Ladi Pavs at home.

Eggless ladi pav recipe
Ingredients
- 2 cups Plain flour Maida (मैदा)
- ¾ cup Milk दुध
- 4 tbsp butter मक्खन
- 1½ tbsp Milk Powder दुध का पाव्डर
- 2 tsp Instant Yeast खमीर / ईस्ट
- 1 tbsp Sugar चीनी
- Milk and Butter दुध और मक्खन
- ¼ tsp Oil for greasing (तेल)
- 1 tsp salt नमक
- 1½ tbsp Milk दुध
Instructions
- Warm the milk, Add the sugar, yeast. Mix well and keep aside for 10 minutes.¾ cup Milk, 1 tbsp Sugar, 2 tsp Instant Yeast
- Add the maida, salt and milk powder in your kitchen platform mix well and make a well.2 cups Plain flour, 1 tsp salt, 1½ tbsp Milk Powder

- After 10 minutes yeast mixture should look frothy(if it does not, then throw and restart or get another brand of yeast), Add this mix to the well and make a dough. It would be on the sticky paste side. Its absolutely perfect.

- Now add the butter to the sticky paste and start kneading. It will turn from sticky mass of dough to a dough that is a dough and turns to a bowl. I mean it turns to a dough, that’s when the gluten is activated and it is ready will take 15 minutes of kneading for reaching that stage. Use scraper to scrape the dough that has stuck. And knead for 15 mins.4 tbsp butter

- DO NOT add any flour or any oil or anything while kneading, dough will automatically become soft. It will be not soft if you add anything while kneading.
- After 15 mins of kneading, transfer this dough to a big bowl, cover and keep aside for 45 mins to one hour.

- It will double in volume after one hour, take some maida dust your hands and punch down the dough. Take out and knead for one minute, if it sticks too much, sprinkle some maida. Dont add too much maida otherwise the pav would not be that soft.
- Now divide this dough to 16 portions, about 30-31 grams each. Now keep one portion in your pan and with other hand roll this in circular motion to make a round shape.
- Take a 8″ square cake tin and grease with oil, place the shaped dough. Keep the dough portions very close touching each other. Otherwise they wont rise up, but rise sideways and become flat.¼ tsp Oil

- Now cover the tin with damp cloth and keep aside for another 40-45 mins.
- Preheat your oven to 200C for 10 minutes.
- Carefully remove the damp cloth after 30 minutes so that they dont stick to the cloth.
- After 45 minutes, brush the pav gently with milk. Gently place the cake tin in the oven and bake for 15 minutes at 200 C.Milk and Butter, 1½ tbsp Milk
- If the buns dont look brown, bake for some more time. Take them out immediately and brush the top part with butter. Keep aside till they cool and ENJOY!


I stay in Bangalore and I also miss good Pav Buns which I used to get in my city Kolhapur. I tried your recipe and It turned out very well. Made me remember my old days. Buns are prepared in No time but standing time of overnight is really difficult for my kids. 🙂
The information is very interesting. I do have a similar blog Wedding Planners in Kerala with a motto to give quality suggestions and advises to my readers. I would like to re post it in my blog. Would you mind granting me permission?
Yes, but with due credit to this blog.
Thanks Smita, but for better results you have to allow this much standing time for buns.